Design A Patch

Premade Design A Patch Sample $0.01 - Add to Cart

From $3.86 No Setup or Art Fees

Creating your own patches has never been easier. With Ninja Patches, you can create a broad range of patch types to suit your every need. Upload your design and make your own patches today.

Each patch order includes a Free roll of Thermal Tape.

Add a Premade Patch Sample to Cart - $0.01 - Add to Cart

Watch - Apply with a Heatpress
 
Patch Size Guide
Patch Size Guide
  • Product
    Preferred Size
  • Hat Square/Circle Patch
    2 inches
  • Hat Rectangle Patch
    4 inches
  • Front Left Chest Shirt
    4 inches
  • Sleeve
    3 inches
  • Back Neckline
    3 inches
 
Buy more and save
Quantity
Qty Discount
Price
25-49 pcs
 
$ ea
50-99
25% off
$ ea
100-199
35% off
$ ea
200-499
55% off
$ ea
500-999
65% off
$ ea
1000+
70% off
$ ea
 
No Setup or Art Fees
25 Piece Minimum

And now also offering & in checkout

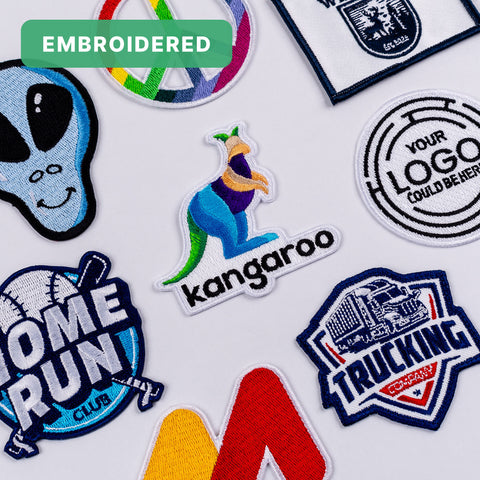
Embroidered Patch Examples

Satisfaction Guaranteed
Custom Shapes & Sizes

Custom Shapes & Sizes

Vivid Details

Vivid Details

Vibrant Colors

Vibrant Colors

Product Details

Add a unique touch to your wardrobe and design a patch with Ninja Patches. Crafted from high-quality materials and boasting meticulous embroidery, our patches are built to last, making them a fantastic choice for expressing your group affiliations, personal interests, or achievements. Each patch is custom-made to align perfectly with your individual requirements.

Unlock a world of customization possibilities and take full control over your patch designs. Our advanced embroidery techniques and superior materials ensure that each patch is a masterpiece of quality and craftsmanship. Choose from three versatile backing options—heat-applied, peel-and-stick, or Velcro—to suit your specific needs. Plus, benefit from significant savings with our bulk order discounts, where you can save up to 70% on larger quantities.

Features

  • High-Quality Embroidery: Each patch features advanced embroidery techniques, using premium threads on durable fabric. This guarantees that every design is sharp, vibrant, and personalizes any backpack beautifully.
  • Superior Durability: Designed to withstand daily wear and tear, our patches have been rigorously tested. They endure multiple wash cycles and exposure to outdoor elements, maintaining their color and structural integrity.
  • Customizable Designs: Our skilled design team works closely with you to create patches that perfectly capture your unique artistic vision and specifications. This ensures your patch accurately represents your personal style or group identity.
  • Versatile Attachment Options: To accommodate different preferences and needs, we offer various backing options, including iron-on, peel-and-stick, and Velcro. These choices make application simple across different types of materials.
  • 100% Satisfaction Guarantee: We adhere to the highest quality standards for our patches. If you're not completely satisfied with your custom patch, we offer a complimentary reprint or adjustment to fulfill your requirements.
  • Bulk Discounts: Benefit from substantial savings on bulk orders. Our discount tiers provide up to a 70% price reduction for large volume purchases, perfect for organizations, clubs, and large-scale events.

Satisfaction Guarantee

We stand behind the quality of the patches we create for you. If you are not satisfied, we will reprint with a new or revised file at no additional charge.

Learn more here.

Pressing Instructions

Click here to watch our Heat Press for Garments Instructions tutorial.

To ensure your patch looks professionally pressed every time, follow these four simple steps.

  1. Position Your Patch: Being that your patch will be pressed facing down, touching the bottom platen, you will first need to secure the patch to your garment with Thermal Tape (heat resistant tape) to ensure it stays in its desired location when being placed on your heat press.
  2. Load Garment Onto Heat Press Face Down: Now that your patch is taped in place, flip the garment over and place onto the heat press so the patch is facing downwards and touching the lower platen. This makes it easier to melt the low-melt glue on the back of the patch so that the patch will adhere to your garment. The goal is to melt the low-melt glue on the back of the patch, not the visible portion of the patch you’ll see when it’s adhered to the garment. 
  3. Press: After laying the garment with patch face down, lay a protective guard sheet over it to protect your garment from the heat, then press for 20 seconds at 350°F with 70-80 PSI or medium-firm pressure.
  4. Allow Patch & Garment To Cool: After done pressing, remove the garment from the press and allow it to cool for at least 30 seconds before removing the thermal tape. This allows the melted glue to solidify, thereby bonding it to your garment.

Art Upload Recommendations

All file types accepted, vector files are always preferred, raster art should be at least 300 DPI.

Care Instructions

To ensure the longevity and maintain the integrity of your patch, follow the care instructions below:

  • Washing: Turn the garment inside out before washing. Use cold or lukewarm water, select a gentle cycle, and a mild detergent. Avoid hot water, bleach, and fabric softeners to prevent weakening the adhesive and fabric. Patches from Ninja Patches are built to last up to 50 wash cycles.
  • Drying: Air dry the garment or use a low heat setting on your dryer. Avoid high heat as it can cause the patch to shrink or the adhesive to weaken.

Order Issues & Reprints

If you don’t love the patch you receive, please let us know within 45 days of receiving your products, by phone, email, or live chat. We will be unable to replace or refund any orders brought to our attention after 45 days of confirmed delivery by our carriers.

Sometimes we will need your assistance to get the order right, and might request a photo or further instructions before reproducing an order. Just so we know how to make it right! We will never ask you to return products before we reproduce a damaged or misprinted order.

You can submit a formal order issue through our Order Issue Form here.

FAQ

Learning how to design a patch doesn’t have to be difficult, and the best part about Ninja Patches is that it doesn’t matter how intricate or basic your design is; we’ll be able to transform it into a patch that draws attention. 

Designing a patch can be a fun and creative process! Whether you're making a patch for a club, military unit, motorcycle vest, or just for fun, here are some steps and tips to help you create a design that stands out: 

  1. Purpose: Determine the purpose of your patch. Is it to represent a group, commemorate an event, or something personal?
  2. Inspiration: Look at other patches for inspiration. Note elements you like, such as shapes, colors, and imagery.
  3. Shape: Patches can be any shape—circular, triangular, square, or custom shapes like shields or emblems.
  4. Size: Consider where the patch will be worn. Common sizes range from about 3 to 5 inches.
  5. Colors: Choose colors that contrast well but also convey the intended message or theme. Limiting the palette to a few colors can make the patch more striking and easier to produce.
  6. Imagery and Symbols: Include symbols, images, or motifs that clearly communicate the theme or identity of the group or idea.
  7. Text: If including text, such as a motto, event, or name, ensure it is readable and fits well within the overall design.

Follow our guide on how to make a patch stand out for more design tips.

You can create your own patches quickly and easily with Ninja Patches by following the steps below: 

  1. Choose your size & shape
  2. Upload your design
  3. Select your border style 
  4. Leave any notes for our designers that you want them to follow during production
  5. Select your backing 
  6. Choose your quantity (minimum 25 pcs) 
  7. Place your order
  8. Approve your artwork proofs
  9. We’ll create and ship 
  10. Press or apply your patch!

It’s never been easier to design a patch. Create your own and place your order today!

  1. Choose the right material to suit your needs - We have a wide range of patch types available to suit any requirement. From leather patches for a rustic feel to print and stitch patches that can handle more intricate detailing, make sure to choose the right material to suit your needs. 
  2. Choose the right attachment method based on longevity - Each of our patch types comes with the ability to apply using a heat press, which is our recommended application method. However, if you’re looking for a more short-term solution, then look no further than the peel & stick method, which is suitable for one-time use. 
  3. Design your patch with purpose in mind - Make sure that the purpose of your patch is always at the forefront of the design and also the placement when you apply it. Whether you want to show off a company logo, a team emblem, or a slogan, how it is seen by the people around you is the most important factor.

Our patches are designed for quick and easy attachment using a heat press, simplifying the application process. There is no need for sewing or using glue, which can peel off over time. The ability to use a heat press means that these custom embroidered patches adhere well to nearly any fabric, making them versatile for various events, organizations, or purposes.

In addition to our popular heat press backing, we also offer peel-and-stick and Velcro options for greater flexibility in how you apply them. The temperature and pressure needed to attach the patches can vary based on the type of material or garment. View our pressing instructions for more information.

We have a minimum order requirement of 25 units for smaller orders. However, orders of 1,000 or more are eligible for bulk discounts, allowing savings of up to 70%.

If you want to learn how to make patches, you’re in the right place. At Ninja Patches, all you have to do is upload an existing design. The best part is you can use designs with unlimited colors and any form of artwork, whether simple or highly detailed and intricate. We’ll then turn it into high-quality patches. Check out our top tips below: 

  1. Choose the right material to suit your needs - We have a wide range of patch types available to suit any requirement. From leather patches for a rustic feel to print and stitch patches that can handle more intricate detailing, make sure to choose the right material to suit your needs. 
  2. Choose the right attachment method based on longevity - Each of our patch types comes with the ability to apply using a heat press, which is our recommended application method. However, if you’re looking for a more short-term solution, then look no further than the peel & stick method, which is suitable for one-time use. 
  3. Design your patch with purpose in mind - Make sure that the purpose of your patch is always at the forefront of the design and also the placement when you apply it. Whether you want to show off a company logo, a team emblem, or a slogan, how it is seen by the people around you is the most important factor.